How to Install M.2 Heatsink in NAS: Complete Step-by-Step Guide
Quick Answer+
Quick Answer: Installing an M.2 heatsink in a NAS takes 10-15 minutes. The basic process: (1) Power down and disconnect your NAS, (2) Remove the access panel, (3) Clean the SSD surface with isopropyl alcohol, (4) Apply the heatsink with thermal pad, (5) Install the SSD and verify temperatures in your NAS OS. Always verify clearance before purchasing—Synology needs ~3mm heatsinks while QNAP/ASUSTOR allow up to 7mm.
Installing an M.2 heatsink in your NAS is one of the most effective upgrades you can make—a $7 investment that can drop SSD temperatures by 15-25°C, prevent thermal throttling, and extend drive lifespan. The process is straightforward, but NAS devices have unique considerations compared to desktop PCs.
This guide walks you through the complete installation process for all major NAS brands, including clearance verification, proper thermal pad application, and post-installation verification.
Before You Begin: Preparation Checklist
Tools and Materials Needed
- Phillips screwdriver: PH1 size for most NAS devices
- Isopropyl alcohol: 90%+ concentration recommended (70% works but evaporates slower)
- Lint-free cloth: Microfiber or coffee filters work well
- Your M.2 heatsink: With included thermal pad
- Anti-static protection: Wrist strap or frequent grounding
- Good lighting: NAS M.2 slots are often in dark corners
- Ruler or calipers: For clearance verification (optional but recommended)
Recommended Heatsinks by NAS Brand
| NAS Brand | Typical Clearance | Recommended Heatsink | Price |
|---|---|---|---|
| Synology | 3-4mm | Thermalright TR-M.2 2280 | $6.99 |
| QNAP | 5-8mm | ARCTIC M2 Pro | $7.99 |
| ASUSTOR | 6-10mm | ARCTIC M2 Pro | $7.99 |
| TerraMaster | 5-7mm | ARCTIC M2 Pro | $7.99 |
| UGREEN NASync | 4-6mm | Thermalright TR-M.2 2280 | $6.99 |
Safety Precautions
- Always power down completely: Never work on a running NAS
- Disconnect all cables: Power, network, USB—everything
- Ground yourself: Touch the metal chassis before handling components
- Work on a clean surface: Avoid carpet (static) and dusty areas
- Don’t force anything: If it doesn’t fit, stop and verify clearance
Step 1: Verify Heatsink Clearance
The most critical step—buying the wrong heatsink wastes money and time. NAS devices have much tighter clearances than desktop motherboards.
How to Measure Clearance
- Access your M.2 slot (following brand-specific instructions below)
- Install your NVMe SSD without any heatsink
- Identify the nearest obstruction above the SSD (chassis, cable, component)
- Measure the gap between SSD surface and obstruction
- Subtract 0.5-1mm for thermal pad compression and safety margin
Example: If you measure 5mm of clearance, purchase a heatsink 4mm or shorter.
Clearance Quick Reference
| Measured Clearance | Maximum Heatsink Height | Compatible Options |
|---|---|---|
| 3-4mm | ~3mm | Thermalright TR-M.2, Atdcoek |
| 4-5mm | ~4mm | Above + ARCTIC M2 Pro, MHQJRH |
| 5-6mm | ~5mm | Above + JEYI Copper Q80 |
| 7mm+ | ~7mm | All options including be quiet! MC1 Pro |
Step 2: Power Down and Access M.2 Slots
Proper Shutdown Procedure
- Log into your NAS web interface
- Navigate to shutdown option:
- Synology DSM: Control Panel → Power → Shutdown
- QNAP QTS: Control Panel → System → Power → Shutdown
- ASUSTOR ADM: Settings → System → Power Off
- TerraMaster TOS: Control Panel → System → Shutdown
- UGREEN UGOS: Settings → System → Shutdown
- Wait for complete shutdown (all LEDs off, no fan spinning)
- Disconnect power cable first, then all other cables
- Wait 30 seconds for capacitors to discharge
Accessing M.2 Slots by Brand
Synology (DS923+, DS1522+, etc.):
- Remove all drive trays from the front
- Locate the bottom panel with M.2 access
- Remove 2-4 Phillips screws securing the panel
- Slide panel off to reveal M.2 slots
QNAP (TS-464, TS-664, etc.):
- Remove bottom panel screws (typically 4)
- Slide bottom panel off
- M.2 slots are visible on the motherboard
ASUSTOR (Lockerstor, Drivestor):
- Remove side or bottom panel depending on model
- Locate M.2 slots on motherboard
- Flashstor models have hot-swap M.2 trays accessible from front
TerraMaster (F-series, T-series):
- Remove bottom panel screws
- Some models require side panel removal
- Consult your model’s quick start guide
UGREEN NASync:
- Remove bottom panel or access through 2.5″ bay area
- M.2 slots typically located under 2.5″ drive cage
- Consult UGOS quick start guide for your specific model
Step 3: Prepare the SSD Surface
Proper surface preparation ensures optimal thermal transfer between your SSD and heatsink.
Cleaning Procedure
- If SSD is installed: Remove the retention screw and slide SSD out at 30-degree angle
- Apply isopropyl alcohol to lint-free cloth (not directly on SSD)
- Wipe the top surface in one direction—don’t scrub back and forth
- Pay attention to the controller chip (square component)—this generates most heat
- Allow complete evaporation—30-60 seconds for 90%+ alcohol, 2-3 minutes for 70%
- Don’t touch the cleaned surface with bare fingers—oils reduce thermal transfer
Should You Remove the SSD Label?
Generally no. The manufacturer’s label provides several benefits:
- Protects NAND chips from direct contact damage
- Provides a thermal interface layer
- Maintains warranty validity
- Quality thermal pads work effectively over labels
Removing the label provides minimal benefit (1-2°C at most) and may void your warranty.
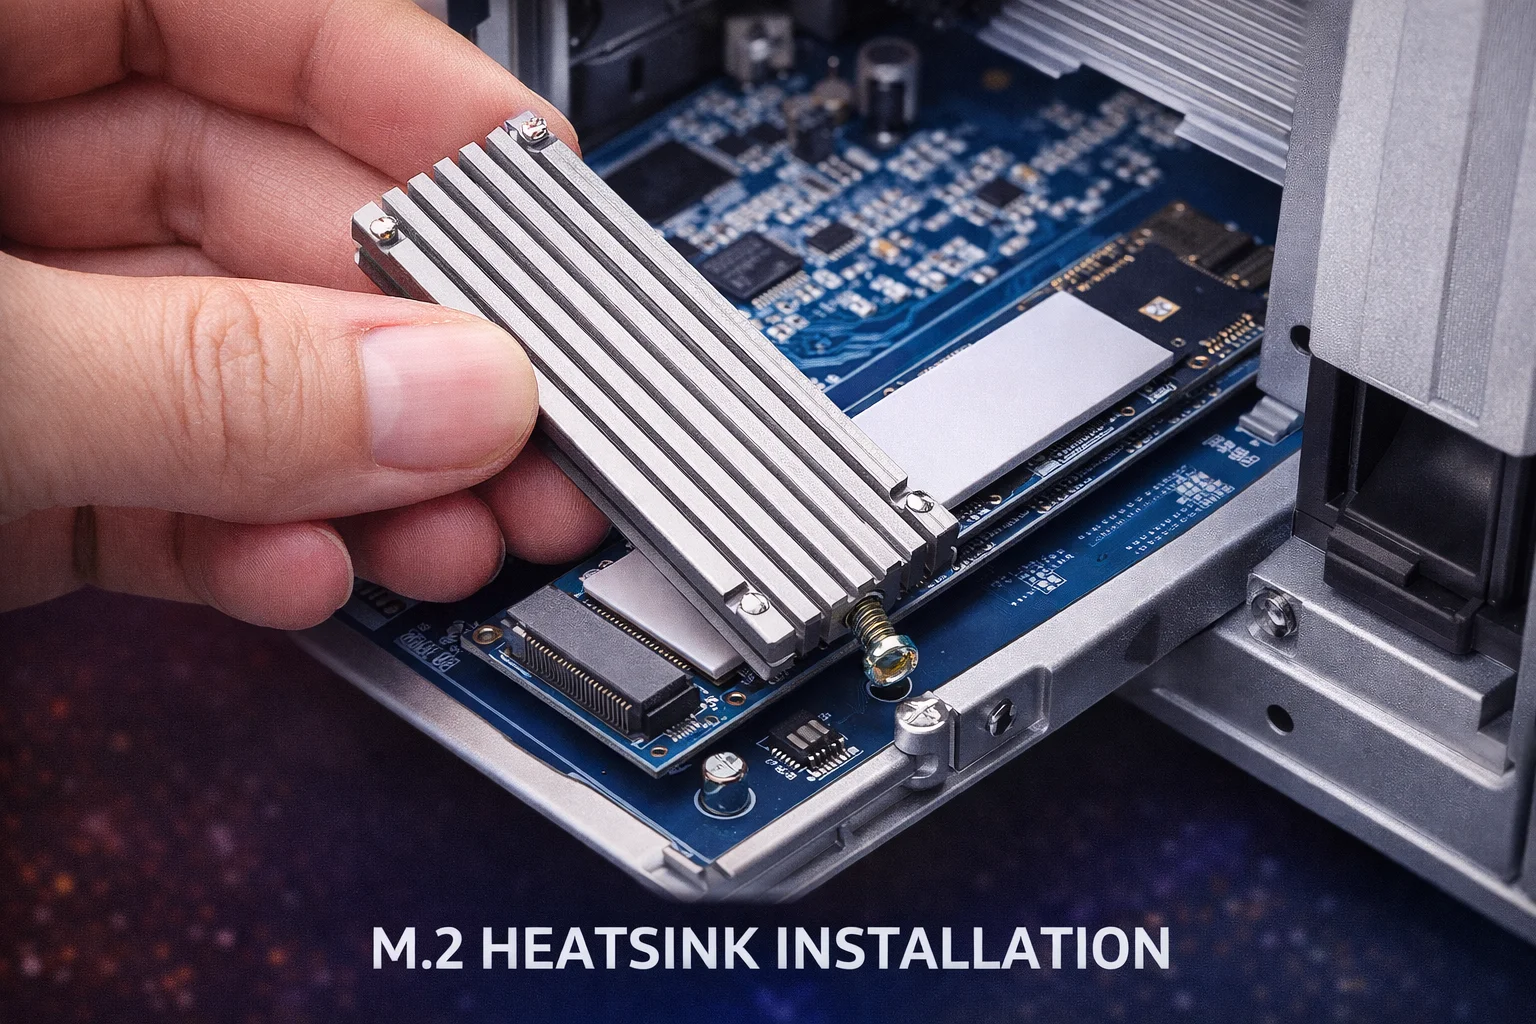
Step 4: Apply the Heatsink
Thermal Pad Preparation
- Locate the thermal pad—usually pre-applied to heatsink or included separately
- Remove protective film from BOTH sides—this is the most common installation mistake
- If pad is separate: Apply to heatsink first, then remove second film before mounting
- Don’t touch the thermal pad surface—oils from fingers reduce effectiveness
Mounting the Heatsink
- Position the heatsink over the SSD with thermal pad facing down
- Align the thermal pad to cover the controller chip (square component near connector)
- Lower straight down—don’t slide, which can create air bubbles
- Apply firm, even pressure for 10-15 seconds
- Secure the heatsink using its mounting mechanism:
- Screw-mount: Tighten evenly, don’t overtighten
- Clip-mount: Snap securely into place
- Rubber strap: Stretch and secure
For Double-Sided SSDs (Clamshell Heatsinks)
- Clean BOTH sides of the SSD
- Remove film from both thermal pads
- Place bottom heatsink plate with pad facing up
- Position SSD on bottom plate
- Add top heatsink plate with pad contacting controller
- Secure screws evenly—alternate corners to ensure even pressure
Step 5: Install the SSD in Your NAS
Physical Installation
- Locate the M.2 slot on your NAS motherboard
- Identify the keying—most NVMe drives are M-keyed (single notch on right)
- Insert at 30-degree angle—connector should engage smoothly
- Push firmly until fully seated—you should feel/hear a click
- Press down gently to align the screw hole
- Secure with M.2 retention screw—snug but not overtightened
Pre-Reassembly Check
Before closing up your NAS:
- Verify heatsink clearance: Does it clear all obstructions?
- Check SSD seating: Is it fully inserted and flat?
- Confirm screw tightness: Snug but not stripped?
- Look for pinched cables: Nothing trapped under heatsink?
Step 6: Reassemble and Verify
Reassembly
- Replace access panel—ensure it sits flush (if it doesn’t, heatsink may be too tall)
- Secure panel screws—same torque as removal
- Reinstall drive trays if removed
- Reconnect all cables—network, USB, power (power last)
- Power on the NAS
Verification in NAS Operating System
Synology DSM:
- Open Storage Manager
- Navigate to HDD/SSD
- Select your M.2 drive
- Check temperature reading under Health Info
QNAP QTS:
- Open Storage & Snapshots
- Navigate to Disks/VJBOD
- Select your M.2 drive
- View temperature in disk details
ASUSTOR ADM:
- Open Storage Manager
- Select your M.2 volume
- Check disk information for temperature
Expected Temperature Results
| Condition | Without Heatsink | With Quality Heatsink | Status |
|---|---|---|---|
| Idle | 45-55°C | 32-42°C | ✅ Normal |
| Light load | 55-65°C | 40-50°C | ✅ Normal |
| Heavy load | 65-80°C | 50-60°C | ✅ Normal |
| Sustained stress | 75-90°C (throttle) | 55-65°C | ✅ Normal |
Troubleshooting Common Issues
Problem: SSD Not Detected After Installation
Solutions:
- Remove SSD and reseat—ensure full insertion
- Check heatsink isn’t blocking M.2 connector
- Try without heatsink to verify SSD functionality
- Verify SSD is compatible with your NAS
- Update NAS firmware to latest version
Problem: Access Panel Won’t Close
Solutions:
- Heatsink too tall—measure and verify clearance
- Switch to lower-profile heatsink (Thermalright ~3mm)
- Use thinner thermal pad (0.5mm instead of 1mm)
- Verify SSD is fully seated flat
Problem: Temperature Still High After Installation
Solutions:
- Verify thermal pad film was removed from BOTH sides
- Check thermal pad contacts controller chip (hottest component)
- Ensure firm heatsink mounting pressure
- Upgrade to premium thermal pads (ARCTIC TP-3)
- Improve ambient ventilation around NAS
- Consider NAS-optimized drives that run cooler (WD Red SN700)
Problem: Heatsink Shifts or Comes Loose
Solutions:
- Tighten mounting screws evenly
- Replace stretched rubber straps
- Consider heatsinks with clip mechanisms (ARCTIC M2 Pro)
- Add small piece of thermal tape for additional security
Frequently Asked Questions
A typical installation takes 10-15 minutes including shutdown, disassembly, heatsink application, and reassembly. First-time installers should budget 20-30 minutes to work carefully and verify each step.
No. Thermal pads are designed for one-time use—they conform to surfaces and lose effectiveness when disturbed. Always use a fresh thermal pad when reinstalling a heatsink. Replacement pads cost $2-5.
Only if both slots are populated with drives. Each drive needs its own heatsink. If running SSD cache in mirrored configuration, both drives will experience similar thermal loads and both need cooling.
Generally no, as long as you don’t remove the SSD’s label or physically damage the drive. However, some manufacturers have specific policies—check your SSD’s warranty terms. Using quality thermal pads over the label is the safest approach.
You have several options: use a thinner thermal pad (0.5mm instead of 1mm), choose a lower-profile heatsink, or verify if slight flex in the access panel is acceptable. Never force a panel closed—this can damage components.
Bottom Line
Installing an M.2 heatsink in your NAS is a straightforward process that delivers significant benefits—15-25°C temperature reductions, eliminated thermal throttling, and extended SSD lifespan. The key is proper preparation: verify clearance before purchasing, clean surfaces thoroughly, and ensure the thermal pad contacts the controller chip.
For most NAS users, the Thermalright TR-M.2 2280 at $6.99 provides the safest universal choice, while the ARCTIC M2 Pro at $7.99 offers premium thermal pads for brands with more generous clearance. Either way, a 10-minute installation protects your expensive SSDs and ensures optimal NAS performance.
Related Guides
- Best NVMe Heatsinks for NAS
- NAS M.2 SSD Overheating: Causes & Fixes
- NVMe SSD Temperature Guide for NAS
- Best Heatsinks for Synology NAS
- Best Heatsinks for QNAP NAS
Last Updated: February 2026