QNAP Setup Guide: Step-by-Step NAS Configuration (2026)
Quick Answer+
Quick Answer: QNAP setup takes 30-60 minutes. Install drives in tool-less trays, connect power and Ethernet, then access setup via Qfinder Pro or your browser. Create a storage pool with RAID (RAID 5 for 4+ bays, RAID 1 for 2 bays), set up shared folders, create user accounts, and enable security settings (disable admin account, enable 2FA). Don’t expose your NAS directly to the internet — use myQNAPcloud or VPN for remote access.
Getting a new QNAP NAS is exciting, but the initial setup can be intimidating. This guide walks you through every step from unboxing to a fully configured, secure NAS. Follow along and you’ll have your QNAP running smoothly in under an hour.
What You’ll Need
- Your QNAP NAS
- Hard drives (NAS-rated drives recommended)
- Ethernet cable
- Computer on the same network
- 30-60 minutes
Step 1: Install Hard Drives
For 3.5″ Drives (Most Common)
- Remove the drive tray — Press the release button/latch and slide the tray out
- Mount the drive — Place the drive in the tray with connectors facing back
- Secure the drive — Use the tool-less clips on each side (snap them into the drive’s screw holes) OR use the included screws
- Slide the tray back — Push until it clicks into place
- Lock the tray — If your model has a lock mechanism, engage it
For 2.5″ Drives (SSDs)
Same process, but you must use screws (included) to secure 2.5″ drives. The tool-less clips don’t fit smaller drives.
M.2 NVMe SSDs (If Applicable)
On most QNAP models (TS-264, TS-464, etc.), M.2 slots are on the bottom:
- Remove the bottom panel (usually 2-4 screws)
- Insert M.2 SSD at 30° angle into the slot
- Press down and secure with the included screw
- Replace the bottom panel
Tip: You can add M.2 drives later for caching. They’re not required for initial setup.
Step 2: Connect and Power On
- Connect Ethernet — Plug an Ethernet cable from your NAS to your router/switch
- Connect power — Plug in the power adapter
- Press the power button — Wait for the NAS to boot (2-3 minutes)
- Watch the LEDs — System LED should turn green when ready
LED Status Guide:
- Green (solid): Ready
- Green (blinking): Booting or activity
- Red: Error (check drive LEDs)
- Orange: Degraded RAID or warning
Step 3: Find Your NAS
Option A: Qfinder Pro (Recommended)
- Download Qfinder Pro from qnap.com/utilities
- Install and run the application
- It will automatically detect your NAS on the network
- Double-click your NAS to open the setup wizard
Option B: Direct Browser Access
- Check your router’s DHCP client list for the NAS IP address
- Open a browser and go to
http://[NAS-IP-ADDRESS]:8080 - Or try
http://[NAS-NAME].local:8080
Option C: install.qnap.com
Navigate to install.qnap.com in your browser. It will scan your network for QNAP devices.
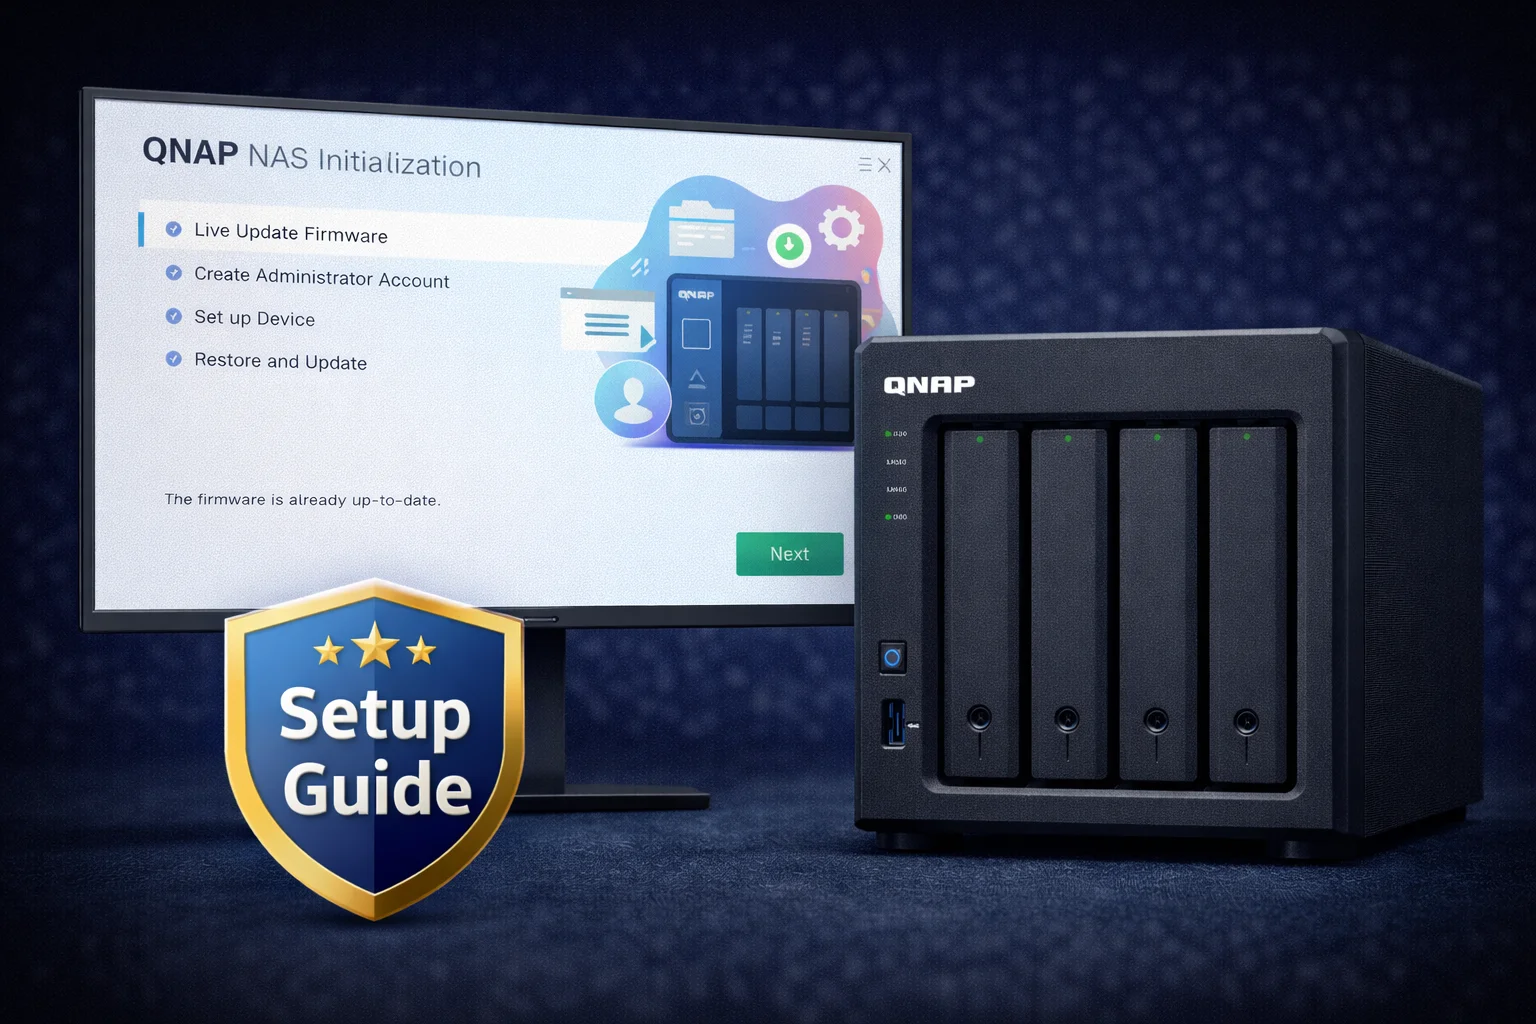
Step 4: Run the Setup Wizard
The Smart Installation Guide walks you through initial configuration:
4.1 Firmware Installation
- The wizard will check for the latest QTS firmware
- Select “Install the latest available version” (recommended)
- Wait for installation (10-15 minutes, NAS will reboot)
4.2 NAS Name and Password
- NAS Name: Choose something descriptive (e.g., “HomeNAS”, “MediaServer”)
- Admin Password: Create a strong, unique password (we’ll disable this account later for security)
4.3 Time Zone and Network
- Set your time zone
- Network settings: DHCP is fine for most users. Set static IP later if preferred.
4.4 Services Configuration
The wizard may ask about enabling services. For now, you can skip these and configure later:
- Multimedia services: Skip (enable Plex manually later)
- Cross-platform file services: Enable if needed now
Step 5: Create Storage Pool and Volume
This is the most important step — configuring your drives for storage.
5.1 Open Storage & Snapshots
- From the QTS desktop, open Storage & Snapshots
- Click Create → New Storage Pool
5.2 Select Drives
- Select all drives you want in the pool
- Check that drive health shows “Good”
5.3 Choose RAID Type
| Drives | Recommended RAID | Usable Capacity | Protection |
|---|---|---|---|
| 2 | RAID 1 | 50% | 1 drive failure |
| 3 | RAID 5 | 67% | 1 drive failure |
| 4 | RAID 5 | 75% | 1 drive failure |
| 4+ | RAID 6 | n-2 drives | 2 drive failures |
| 6+ | RAID 10 | 50% | 1 per pair (fast) |
For most home users: RAID 5 (4+ drives) or RAID 1 (2 drives) provides the best balance of capacity and protection.
5.4 Create Volume
After creating the storage pool, create a volume:
- Click Create → New Volume
- Choose Thick or Thin provisioning (Thick recommended for beginners)
- Allocate space (use all available for single volume)
- Complete the wizard
Note: RAID initialization runs in the background and can take hours/days depending on drive size. Your NAS is usable during this time.
Step 6: Create Shared Folders
Shared folders are where you store and access files.
- Open Control Panel → Privilege → Shared Folders
- Click Create → Shared Folder
- Enter a folder name (e.g., “Media”, “Documents”, “Backup”)
- Select the volume you created
- Configure access permissions (who can read/write)
- Click Create
Recommended folders:
- Media — Movies, TV shows, music
- Photos — Photo library
- Documents — Personal files
- Backup — Computer backups
- TimeMachine — Mac backups (if applicable)
Step 7: Create User Accounts
Create individual accounts for each person accessing the NAS.
- Open Control Panel → Privilege → Users
- Click Create → Create a User
- Enter username and password
- Assign folder permissions (which shared folders they can access)
- Set application permissions (which apps they can use)
Best practice: Create a personal admin account with a strong password, then disable the default “admin” account (covered in security section).
Step 8: Enable File Sharing Protocols
Enable the protocols your devices need:
For Windows
- Control Panel → Network & File Services → Win/Mac/NFS/WebDAV
- Enable Microsoft Networking (SMB)
- Set SMB version to SMB3 for security
Access from Windows: \\NAS-NAME or \\NAS-IP-ADDRESS
For Mac
- SMB works on Mac (same as Windows)
- Or enable AFP for legacy compatibility
Access from Mac: Finder → Go → Connect to Server → smb://NAS-NAME
For Time Machine (Mac Backup)
- Create a shared folder called “TimeMachine”
- In shared folder settings, enable “Set this folder as a Time Machine backup folder”
- On your Mac, select this folder as Time Machine destination
Step 9: Security Configuration (Critical)
Don’t skip this section. Proper security prevents ransomware and unauthorized access.
9.1 Disable Default Admin Account
- Create a new admin user with a different username
- Log out and log in as the new admin
- Go to Control Panel → Users
- Select “admin” → Edit → Disable this account
9.2 Enable 2-Factor Authentication
- Control Panel → Security → 2-Step Verification
- Enable for all admin accounts
- Use an authenticator app (Google Authenticator, Authy, etc.)
9.3 Enable Auto-Updates
- Control Panel → System → Firmware Update
- Enable Auto Update or at minimum notification
- Check for updates weekly
9.4 Don’t Expose to Internet
Critical: Do not forward ports or expose your NAS directly to the internet. Use these instead:
- myQNAPcloud Link: QNAP’s relay service (safe, no port forwarding)
- VPN: Connect to your home network securely
- Tailscale/ZeroTier: Easy VPN alternatives
9.5 Enable IP Access Protection
- Control Panel → Security → IP Access Protection
- Enable protection for SSH, HTTP, FTP, etc.
- Set to block IPs after 5 failed attempts in 5 minutes
Step 10: Install Essential Apps
Open App Center from the QTS desktop to install apps:
Recommended apps:
- Plex Media Server — Media streaming (if you use Plex)
- QuMagie — Photo management with AI
- Hybrid Backup Sync — Backup to cloud/remote
- Qsync Central — File synchronization
- Container Station — Docker containers (if needed)
- Malware Remover — Security scanning
Step 11: Set Up Mobile Access
Install QNAP mobile apps for remote access:
- Qfile: File browsing and sharing
- QuMagie: Photo viewing and auto-upload
- Qmanager: NAS monitoring
- Qsync: File synchronization
For remote access, set up myQNAPcloud:
- Open myQNAPcloud app on the NAS
- Create or sign in to QNAP ID
- Enable myQNAPcloud Link (relay service)
- Disable auto router configuration (UPnP) for security
Frequently Asked Questions
Initial setup takes 30-60 minutes. RAID initialization runs in the background afterward and can take hours to days depending on drive size. Your NAS is usable during initialization.
For 2 drives, use RAID 1 (mirroring). For 4+ drives, use RAID 5 (one drive parity). For 6+ drives with critical data, consider RAID 6 (two drive parity). RAID protects against drive failure but is NOT a backup.
Yes. Create a new admin account with a unique username, then disable the default ‘admin’ account. This prevents attacks targeting the known ‘admin’ username.
Use myQNAPcloud Link (built-in relay, no port forwarding) or set up a VPN. Never expose your NAS directly to the internet via port forwarding — this invites attacks.
Use NAS-rated drives: Seagate IronWolf or WD Red Plus. Avoid desktop drives (WD Blue, Seagate Barracuda) and SMR drives.
Yes. You can add drives to empty bays or expand storage pools. Some RAID types (RAID 5, 6) allow expansion. You can also add expansion units (TR-004, TL-D800S) for more bays.
Next Steps
Your QNAP is now set up and ready to use. Here’s what to do next:
- Set up Plex Media Server
- Configure backup strategy
- Install Docker containers
- Set up photo management
- Advanced security hardening
Related Resources
- Best QNAP NAS 2026
- QNAP Compatible Hard Drives
- QNAP RAID Configuration Guide
- QNAP Troubleshooting Guide
Last Updated: February 2026