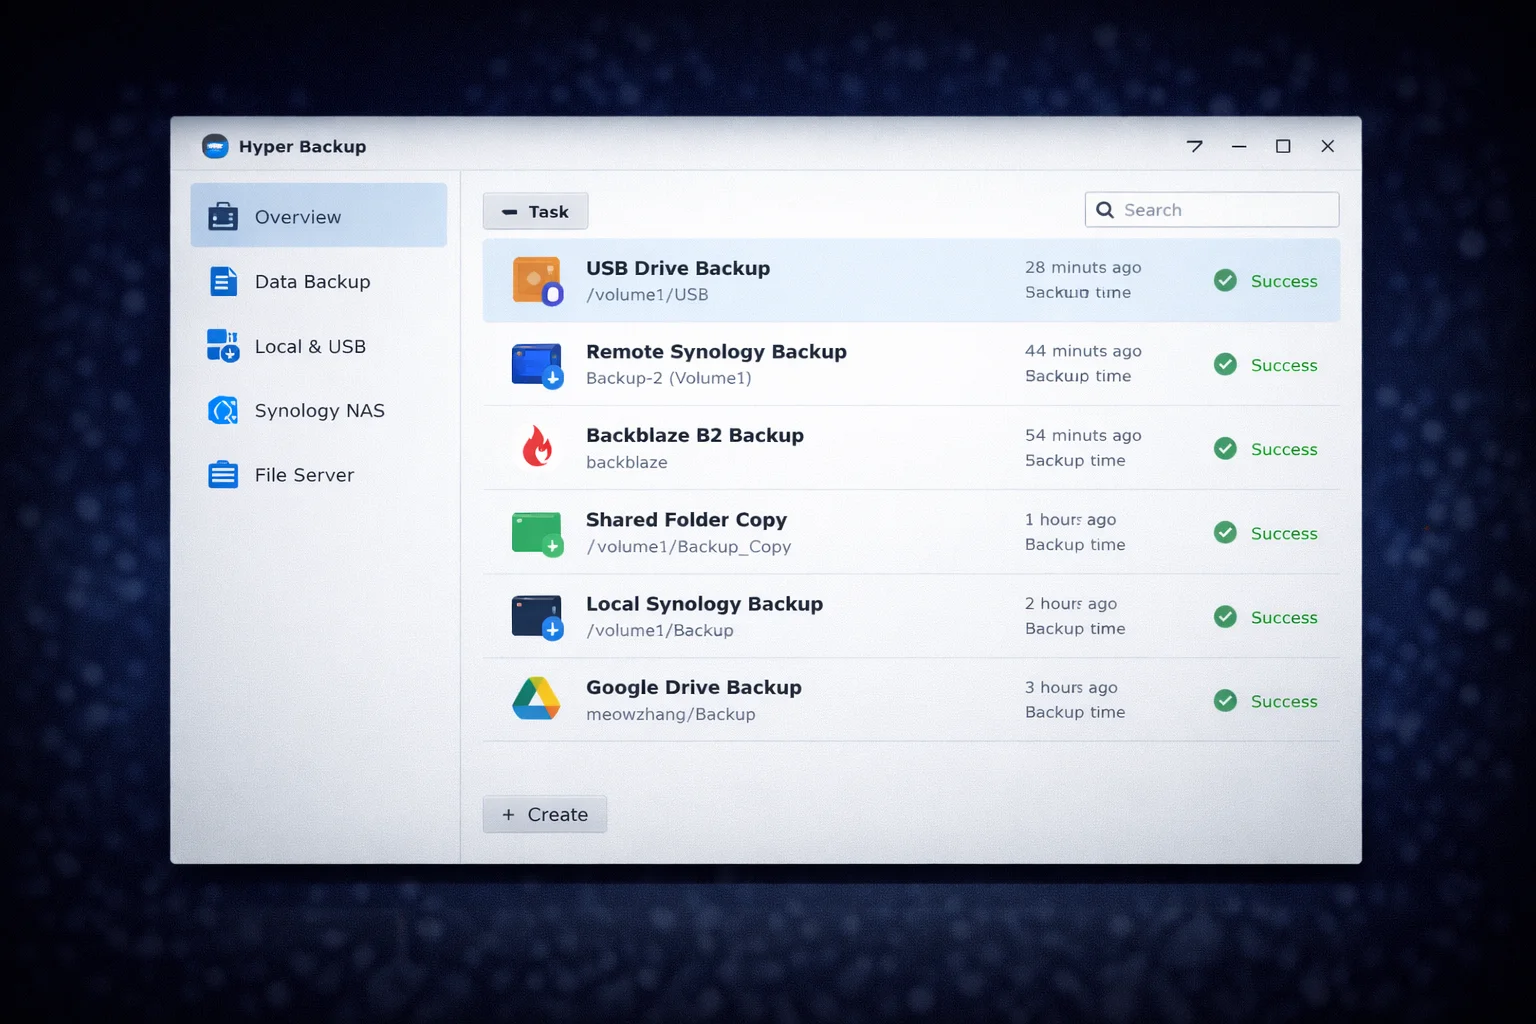
Synology Hyper Backup Guide: Complete Backup Strategy for Your NAS
Quick Answer+
Quick Answer: Hyper Backup protects your Synology NAS data by backing up TO external destinations—cloud storage (Backblaze B2, AWS S3, Google Drive), USB drives, or remote NAS. Install from Package Center, create backup tasks selecting folders and applications, configure schedules and retention, then enable encryption for security. Follow the 3-2-1 rule: 3 copies, 2 different media types, 1 offsite.
Your Synology NAS likely contains irreplaceable data—family photos, business documents, media libraries. While Active Backup for Business protects devices backing up TO your NAS, Hyper Backup protects your NAS itself by backing up FROM the NAS to external destinations.
This guide covers complete Hyper Backup setup including cloud destinations, local backups, encryption, scheduling, and the critical 3-2-1 backup strategy every NAS owner should implement.
Understanding the Backup Ecosystem
Before diving into Hyper Backup, understand how Synology’s backup tools work together:
| Tool | Direction | Purpose |
|---|---|---|
| Active Backup | TO your NAS | Backup PCs, servers, VMs, Microsoft 365 |
| Hyper Backup | FROM your NAS | Backup NAS data to external destinations |
| Snapshot Replication | Between NAS | Real-time replication to secondary NAS |
| Cloud Sync | Bidirectional | Sync folders with cloud storage |
| USB Copy | TO/FROM USB | Simple one-button USB backup |
Hyper Backup is your primary defense against NAS failure, ransomware, fire, theft, and accidental deletion. It creates versioned backups that let you restore files from any point in time.
The 3-2-1 Backup Rule
Every backup strategy should follow the 3-2-1 rule:
- 3 copies of your data (original + 2 backups)
- 2 different media types (NAS + USB drive, or NAS + cloud)
- 1 offsite copy (cloud storage or physically remote location)
Example 3-2-1 Implementation
| Copy | Location | Media Type | Purpose |
|---|---|---|---|
| 1 (Original) | Synology NAS | HDD RAID | Primary working copy |
| 2 (Local backup) | USB external drive | External HDD | Fast local recovery |
| 3 (Offsite backup) | Backblaze B2 cloud | Cloud storage | Disaster recovery |
Prerequisites
System Requirements
- DSM Version: DSM 7.0 or later
- Package: Hyper Backup (free from Package Center)
- Destination: Cloud account, USB drive, or remote NAS
- RAM: 2GB minimum, 4GB+ recommended for large backups
Recommended NAS Models
Synology DS224+
2-Bay | Intel Celeron J4125 | 2GB RAM | 1GbE
Excellent entry-level NAS for personal backup needs. Supports all Hyper Backup destinations including cloud and USB. Upgrade RAM to 8GB for faster backup processing.
Synology DS923+
4-Bay | AMD Ryzen R1600 | 4GB RAM (expandable to 32GB) | 1GbE
Ideal for businesses with larger backup requirements. More storage capacity and processing power for handling multiple backup tasks simultaneously.
Step 1: Install Hyper Backup
- Log into DSM as administrator
- Open Package Center
- Search for “Hyper Backup”
- Click Install
- Wait for installation to complete
- Open Hyper Backup from the main menu
Backup Destination Options
Local Destinations
| Destination | Pros | Cons | Best For |
|---|---|---|---|
| USB External Drive | Fast, no ongoing cost, easy rotation | Same location risk, manual effort | Local quick recovery |
| Remote Synology NAS | Fast LAN backup, native integration | Requires second NAS | Business continuity |
| rsync Server | Flexible, cross-platform | Technical setup required | Linux environments |
Cloud Destinations
| Provider | Cost (per TB/month) | Pros | Best For |
|---|---|---|---|
| Backblaze B2 | $6 | Cheapest, simple pricing | Large backups on budget |
| AWS S3 | $23 (Standard) | Reliable, scalable, tiered storage | Enterprise, compliance |
| Synology C2 | $70 (1TB plan) | Native integration, easy setup | Synology ecosystem users |
| Google Drive | $10 (100GB) | Familiar interface | Small personal backups |
| Microsoft Azure | $18 (Hot tier) | Enterprise features | Microsoft environments |
Our recommendation: Backblaze B2 offers the best value for most users—simple pricing at $6/TB/month with no egress fees for restores up to 3x your stored data.
Step 2: Create Backup to USB Drive (Local)
Start with a local USB backup for fast recovery scenarios:
Connect USB Drive
- Connect USB external drive to your NAS
- Open Control Panel → External Devices
- Verify drive is detected and formatted (ext4 or NTFS)
- Note the drive name (e.g., usbshare1)
Create USB Backup Task
- Open Hyper Backup
- Click the + button → Data backup task
- Select Local folder & USB
- Choose your USB drive as destination
- Create or select a backup folder
- Click Next
Select Data to Backup
- Check folders to include:
- /photo – Synology Photos shared space
- /homes – All user home directories
- /documents – Shared documents
- Any other critical shared folders
- Select applications to backup (optional):
- Synology Photos configuration
- Synology Drive settings
- Surveillance Station
- Note Station
- Click Next
Configure Backup Settings
- Task name: Descriptive name (e.g., “USB-Weekly-Backup”)
- Enable task notification: Yes (get email alerts)
- Enable backup integrity check: Yes (verifies backup validity)
- Enable client-side encryption: Yes (CRITICAL for security)
- Encryption password: Strong, unique password (SAVE THIS!)
- Click Next
Warning: If you lose your encryption password, you cannot restore your backups. Store the password securely in a password manager.
Configure Rotation (Retention)
- Enable backup rotation: Yes
- Choose rotation method:
- Smart Recycle: Keeps hourly backups from past 24 hours, daily from past week, weekly from past month (recommended)
- GFS (Grandfather-Father-Son): Keeps daily, weekly, monthly, yearly versions
- Custom: Define your own retention rules
- Click Apply
Recommended USB Drives
WD My Passport 4TB
USB 3.0 | Portable | Password Protection | 3-Year Warranty
Compact portable drive for personal NAS backups. Hardware encryption adds security layer. Easy to store offsite or rotate between locations.
SanDisk Extreme Portable SSD 1TB
USB 3.2 Gen 2 | 1050 MB/s | IP65 Water Resistant
Faster backup and restore with SSD speeds. Rugged design survives drops and water exposure. Ideal for critical data requiring fast recovery.
Step 3: Create Backup to Cloud (Offsite)
Cloud backup provides essential offsite protection against local disasters.
Setting Up Backblaze B2
Backblaze B2 offers the best value for cloud backup. Here’s how to set it up:
Create Backblaze B2 Account:
- Go to backblaze.com and create account
- Navigate to B2 Cloud Storage
- Create a new bucket (e.g., “synology-backup”)
- Set bucket to Private
- Go to App Keys → Create new application key
- Save the keyID and applicationKey (shown only once)
Create Hyper Backup Task for B2:
- Open Hyper Backup → Click + → Data backup task
- Select S3 Storage (B2 is S3-compatible)
- Configure connection:
- S3 Server: s3.us-west-004.backblazeb2.com (use your region)
- Access Key: Your B2 keyID
- Secret Key: Your B2 applicationKey
- Bucket: Select your bucket
- Select folders and applications (same as USB backup)
- Enable client-side encryption: CRITICAL for cloud backups
- Configure schedule: Daily at off-peak hours (e.g., 2:00 AM)
- Set rotation: Smart Recycle or GFS
- Click Apply
Setting Up Synology C2
Synology C2 offers the easiest setup with native integration:
- Open Hyper Backup → Click + → Data backup task
- Select Synology C2 Storage
- Sign in with your Synology Account
- Select or create storage plan
- Configure folders, encryption, and schedule
- Click Apply
C2 costs more than B2 but offers seamless integration and is managed entirely through DSM.
Step 4: Configure Backup Schedule
Recommended Schedules
| Backup Type | Schedule | Rationale |
|---|---|---|
| Cloud (critical data) | Daily at 2:00 AM | Frequent protection, off-peak hours |
| USB (full backup) | Weekly on Sunday | Less frequent, manual rotation |
| Cloud (large media) | Weekly on Saturday | Reduces bandwidth/costs |
Configure Schedule in Hyper Backup
- Open backup task → Edit
- Navigate to Schedule tab
- Enable Enable backup schedule
- Configure schedule options:
- Run on the following days: Select days
- Start time: Off-peak hours
- Run only when idle: Optional for low-priority backups
- Click OK
Step 5: Test Your Backups
Backups are worthless if you can’t restore from them. Test regularly:
Backup Integrity Check
- Open Hyper Backup
- Select backup task
- Click Backup Integrity (checkmark icon)
- Select Check backup integrity
- Wait for verification to complete
Test Restore (File Level)
- Open Hyper Backup
- Select backup task → Click Restore
- Choose backup version (date/time)
- Browse to a test file
- Select Restore to different location
- Verify restored file opens correctly
Testing Schedule
- Monthly: File-level restore test
- Quarterly: Application restore test
- Annually: Full disaster recovery simulation
Restoring from Hyper Backup
Restore Individual Files
- Open Hyper Backup
- Select backup task
- Click Restore button
- Use timeline to select backup version
- Navigate to files/folders to restore
- Choose restore location:
- Original location: Overwrites current files
- Different location: Restores to new folder
- Click Restore
Restore Entire NAS (Disaster Recovery)
If your NAS fails completely and you need to restore to new hardware:
- Set up replacement NAS with DSM
- Install Hyper Backup
- Click Restore → Data
- Select backup source (cloud/USB)
- Enter encryption password
- Select backup version
- Restore folders and applications
Advanced Configuration
Bandwidth Limiting
Prevent backups from saturating your internet connection:
- Open backup task → Edit
- Navigate to Settings tab
- Enable Enable transfer encryption (for network backups)
- Set Bandwidth limit (e.g., 50% of upload speed)
- Configure schedule for limit (e.g., daytime only)
Compression Settings
Compression reduces storage but increases CPU usage:
- Enable compression: Recommended for documents, databases
- Disable compression: For already-compressed media (photos, videos, music)
Multi-Version Backup vs Single Version
Hyper Backup supports two backup modes:
- Multi-version (default): Keeps multiple versions with rotation—ideal for ransomware protection
- Single version: Mirror backup without versioning—uses less space but no point-in-time recovery
Always use multi-version for your primary backup—it protects against ransomware that could encrypt files before you notice.
Storage Requirements
Drives for Local Backup
| Product | Capacity | Price | $ / TB | Price Drop | Brand | Interface |
|---|---|---|---|---|---|---|
| Western Digital 18TB Elements Desktop External Hard Drive USB 3.0 for plug-and-play storage - Western DigitalBWLG0180HBK-NESN | 18.00 TB | $369.99 | $20.56 | -5% | WD | USB |
| Seagate (STEB8000100) Expansion Desktop 8TB External Hard Drive HDD – USB 3.0 for PC Laptop | 8.00 TB | $229.00 | $28.63 | +0% | Seagate | USB |
Frequently Asked Questions
Estimate 1.5-2x your source data size for versioned backups. Example: 2TB of NAS data with 30-day retention needs roughly 3-4TB cloud storage. Enable deduplication and compression to reduce requirements.
Backblaze B2 is significantly cheaper ($6/TB vs ~$70/TB for C2) and works well with Hyper Backup. Synology C2 offers easier setup and native integration but at premium pricing. For most users, B2 is the better value.
Initial backup time depends on your data size and upload speed. At 10 Mbps upload: ~100GB takes 24 hours, 1TB takes 10 days. Consider seeding with USB drive first for large datasets—some cloud providers accept mailed drives.
Hyper Backup creates versioned backups with encryption and rotation—designed for disaster recovery. Cloud Sync mirrors folders bidirectionally with cloud storage—designed for file access across devices. Use Hyper Backup for protection, Cloud Sync for synchronization.
Yes, using Hyper Backup Explorer (free desktop app for Windows/Mac/Linux). Download from Synology’s website, point it to your backup files, enter your encryption password, and browse/restore files without needing a NAS.
Absolutely yes, especially for cloud backups. Client-side encryption ensures only you can read your data—not the cloud provider, hackers, or anyone else. The only downside is you must keep your password safe; lose it and your backup is unrecoverable.
Conclusion
Hyper Backup is essential protection for your Synology NAS. By implementing the 3-2-1 backup strategy—local USB backup for fast recovery plus cloud backup for disaster protection—you ensure your data survives hardware failure, ransomware, theft, or natural disasters.
Key takeaways: Always enable encryption, test restores regularly, use multi-version backups for ransomware protection, and consider Backblaze B2 for cost-effective cloud storage. Combined with Active Backup for Business protecting your PCs and Synology Photos backing up your mobile devices, you’ll have comprehensive protection for your entire digital life.
Related Resources
- Synology Active Backup Guide
- Synology Photos Setup Guide
- Synology Drive Setup Guide
- Best Synology NAS 2026
- Synology DS224+ Review
- Synology DS923+ Review
- Synology Compatible Hard Drives
- Synology Security Hardening Guide
Last Updated: February 2026