Synology Security Guide: Protect Your NAS from Hackers and Ransomware
Quick Answer+
Quick Answer: Secure your Synology NAS by: (1) Never exposing it directly to the internet—use VPN for remote access, (2) Enabling 2FA for all accounts, (3) Keeping DSM updated, (4) Using strong unique passwords, (5) Enabling the firewall with geo-blocking, (6) Disabling unused services, and (7) Maintaining 3-2-1 backups. These steps protect against 99% of NAS attacks.
Your Synology NAS likely contains your most valuable data—family photos, financial documents, business files. Unfortunately, NAS devices are prime targets for ransomware and hackers because they’re often connected to the internet with weak security. The good news: Synology provides excellent security tools, and following this guide will make your NAS virtually impenetrable to common attacks.
This comprehensive guide covers every aspect of NAS security, from basic hardening to advanced threat protection. Whether you’re a home user or managing a business NAS, these practices will protect your data.
Understanding NAS Security Threats
Common Attack Vectors
| Threat | How It Works | Prevention |
|---|---|---|
| Ransomware | Encrypts files, demands payment | VPN access, backups, updates |
| Brute Force | Guesses passwords repeatedly | Strong passwords, 2FA, auto-block |
| Vulnerability Exploits | Uses unpatched security holes | Keep DSM updated |
| Phishing | Tricks users into revealing credentials | 2FA, user education |
| Port Scanning | Finds exposed services | Firewall, VPN, no port forwarding |
Why Synology Has Better Security Than QNAP
As discussed in our Synology vs QNAP comparison, Synology has a significantly stronger security track record. QNAP devices have been targeted by multiple high-profile ransomware campaigns (Qlocker, Deadbolt, eCh0raix), while Synology has had far fewer incidents. This doesn’t mean Synology is immune—it means their security-first approach reduces risk.
Security Priority Checklist
Complete these steps in order of priority:
| Priority | Action | Impact | Difficulty |
|---|---|---|---|
| 🔴 Critical | Use VPN instead of port forwarding | Blocks 95% of attacks | Medium |
| 🔴 Critical | Enable 2FA for all accounts | Stops credential theft | Easy |
| 🔴 Critical | Keep DSM updated | Patches vulnerabilities | Easy |
| 🟠 High | Strong unique passwords | Prevents brute force | Easy |
| 🟠 High | Enable firewall with geo-blocking | Reduces attack surface | Easy |
| 🟠 High | Configure auto-block | Stops brute force | Easy |
| 🟡 Medium | Disable admin account | Removes default target | Easy |
| 🟡 Medium | Disable unused services | Reduces attack surface | Easy |
| 🟢 Good | Enable account protection | Extra brute force protection | Easy |
| 🟢 Good | Encrypt shared folders | Protects data at rest | Medium |
Step 1: Never Expose Your NAS Directly to Internet
This is the single most important security measure. Most NAS attacks happen because users forward ports directly to their NAS, making it visible to the entire internet.
What NOT to Do
- ❌ Don’t forward port 5000/5001 (DSM) to your NAS
- ❌ Don’t forward port 22 (SSH) to your NAS
- ❌ Don’t enable UPnP for automatic port forwarding
- ❌ Don’t use DDNS without VPN
Safe Remote Access Options
Option 1: VPN (Recommended)
Set up a VPN server and connect securely from anywhere:
- Install VPN Server from Package Center
- Configure OpenVPN or L2TP/IPSec
- Export configuration file
- Import to OpenVPN client on phone/laptop
- Forward only VPN port (1194 for OpenVPN) on router
- Connect via VPN, then access NAS using local IP
Option 2: QuickConnect (Convenient but Less Secure)
QuickConnect routes through Synology’s relay servers, avoiding direct exposure:
- Go to Control Panel → External Access → QuickConnect
- Enable and sign in with Synology Account
- Choose a QuickConnect ID
- Access via yourID.quickconnect.to
QuickConnect is safer than port forwarding but still has risks. Always combine with 2FA.
Option 3: Tailscale/ZeroTier (Easy VPN Alternative)
These services create encrypted tunnels without complex VPN setup:
- Create account at tailscale.com or zerotier.com
- Install client on NAS via Docker or Package Center (Tailscale)
- Install client on devices
- Access NAS via private Tailscale/ZeroTier IP
Step 2: Enable Two-Factor Authentication (2FA)
2FA protects against stolen passwords—even if someone has your password, they can’t log in without the second factor.
Enable 2FA for Admin Account
- Log into DSM
- Click your profile icon → Personal → Account
- Under Sign-in Method, click 2-Factor Authentication
- Choose method: Authenticator app (recommended), hardware key, or Synology Secure SignIn
- Scan QR code with authenticator app (Google Authenticator, Authy, etc.)
- Enter verification code to confirm
- Save backup codes securely (password manager)
Enforce 2FA for All Users
- Go to Control Panel → Security → Account
- Enable Enforce 2-factor authentication for the following users
- Select All users or specific groups
- Click Apply
Step 3: Keep DSM Updated
Security patches fix vulnerabilities that attackers exploit. Never delay updates.
Enable Automatic Updates
- Go to Control Panel → Update & Restore
- Click Update Settings
- Enable Install new updates automatically or Notify me and let me decide
- Set update time to off-peak hours
- Enable Automatically update installed packages
Check for Updates Manually
- Go to Control Panel → Update & Restore
- Click Check for Updates
- Review release notes for security fixes
- Install immediately if security-related
Step 4: Configure Strong Password Policy
Set Password Requirements
- Go to Control Panel → User & Group → Advanced
- Under Password Settings, configure:
- Minimum length: 12+ characters
- Mixed case letters: Required
- Numeric characters: Required
- Special characters: Required
- Exclude username: Enabled
- Password history: Remember last 5 passwords
- Enable Force users to change password after reset
- Click Apply
Use a Password Manager
Strong passwords are impossible to remember. Use a password manager like Bitwarden, 1Password, or KeePass to generate and store unique passwords for each account.
Step 5: Enable and Configure Firewall
Enable Built-in Firewall
- Go to Control Panel → Security → Firewall
- Check Enable firewall
- Select Firewall Profile → Edit Rules
Recommended Firewall Rules
Create rules to allow only necessary traffic:
| Rule | Ports | Source | Action |
|---|---|---|---|
| Allow LAN | All | 192.168.1.0/24 (your subnet) | Allow |
| Allow VPN | 1194 (OpenVPN) | All | Allow |
| Block foreign countries | All | Geo-block list | Deny |
| Deny all else | All | All | Deny |
Enable Geo-Blocking
Block connections from countries you’ll never access your NAS from:
- In Firewall, create a new rule
- Source IP → Location
- Select countries to block (common attack sources: Russia, China, North Korea)
- Action: Deny
Step 6: Configure Auto-Block
Auto-block automatically bans IP addresses that fail too many login attempts.
- Go to Control Panel → Security → Protection
- Enable Enable auto block
- Configure:
- Login attempts: 5
- Within (minutes): 5
- Block expiration: Never (or 30 days)
- Enable Enable block expiration if you want temporary blocks
- Add your home IP to Allow/Block List to prevent lockout
Step 7: Disable Default Admin Account
The “admin” account is the first target for attackers. Disable it and use a custom admin account.
- Create a new administrator account with a unique name
- Log in with the new account
- Go to Control Panel → User & Group
- Select the “admin” account → Edit
- Check Disable this account
- Click OK
Step 8: Disable Unused Services
Every enabled service is a potential attack vector. Disable what you don’t use.
Services to Disable If Not Used
- SSH: Control Panel → Terminal & SNMP → Disable if not needed
- Telnet: Should always be disabled
- FTP: Control Panel → File Services → FTP → Disable
- SMB 1.0: Control Panel → File Services → SMB → Advanced → Disable SMB1
- NFS: Disable if not using Linux clients
- SNMP: Control Panel → Terminal & SNMP → Disable
Uninstall Unused Packages
- Open Package Center
- Go to Installed
- Remove packages you don’t use
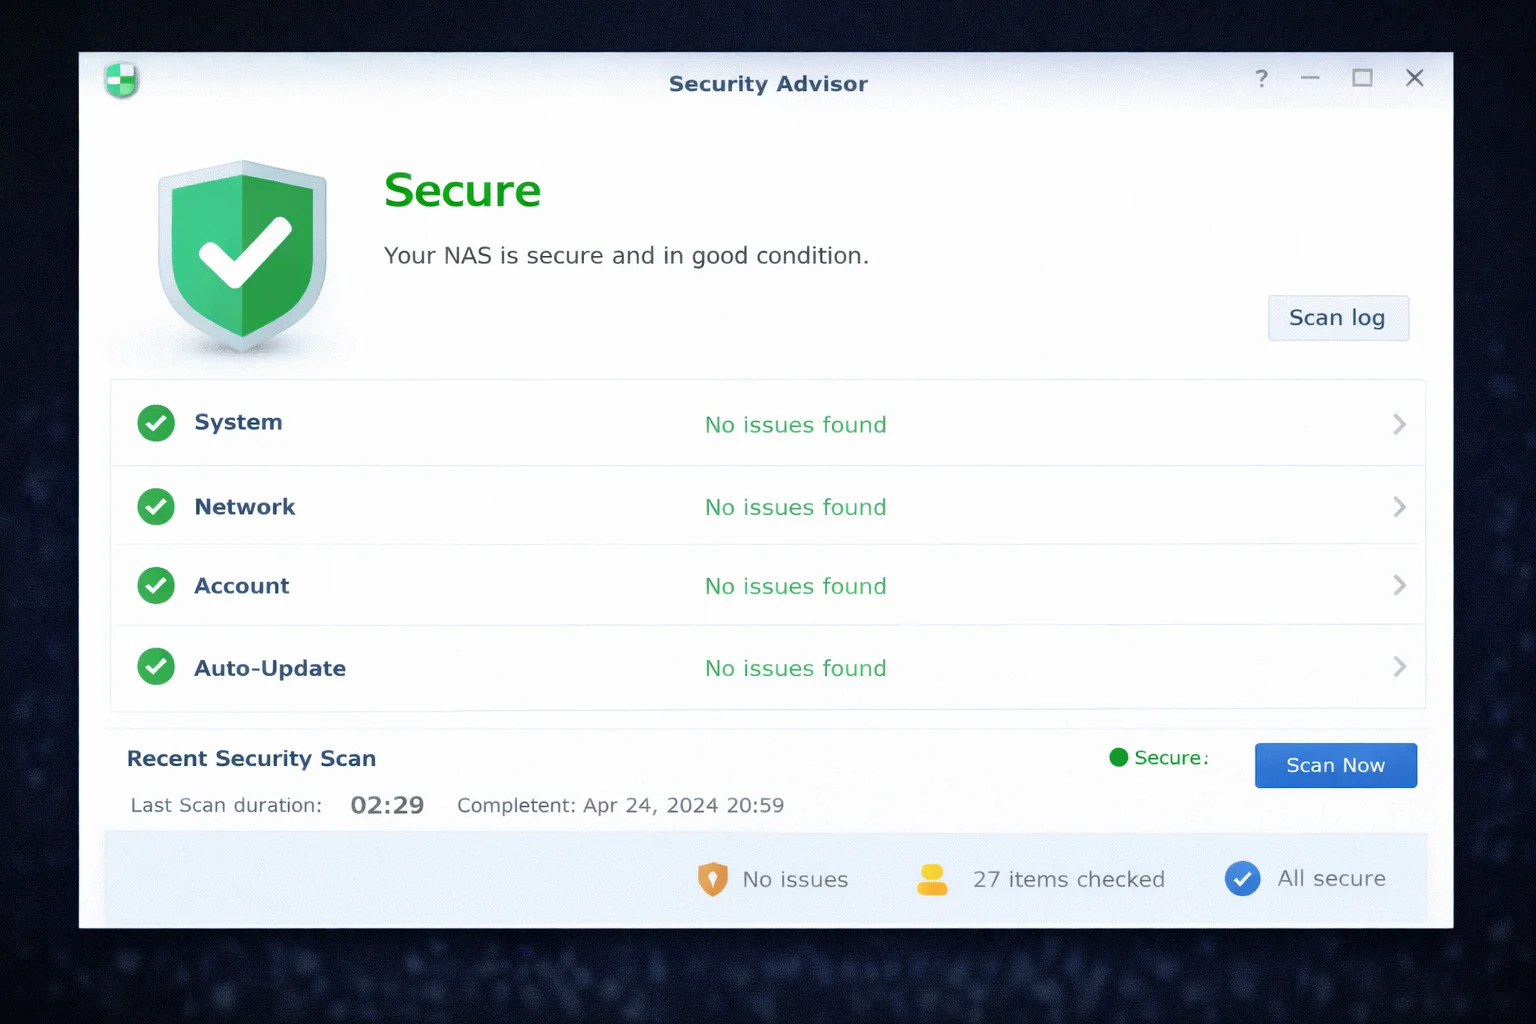
Step 9: Run Security Advisor
Synology’s Security Advisor scans for common security issues.
- Open Security Advisor from main menu
- Click Scan
- Review results and fix issues:
- Critical: Fix immediately
- Warning: Fix soon
- Information: Consider fixing
- Schedule regular scans: Settings → Schedule
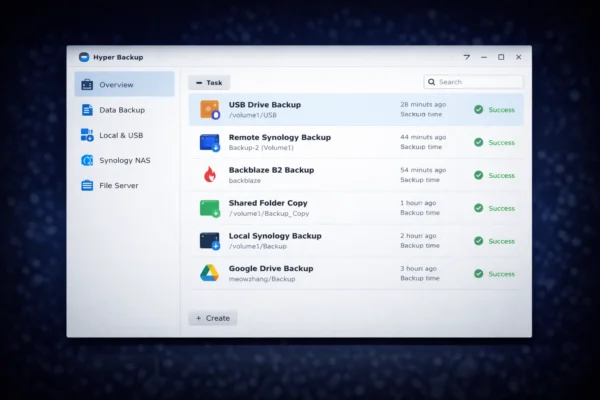
Step 10: Implement 3-2-1 Backup Strategy
Even with perfect security, disasters happen. Backups are your last line of defense against ransomware.
- 3 copies of data (original + 2 backups)
- 2 different media (NAS + USB + cloud)
- 1 offsite (cloud or physically separate location)
See our Hyper Backup guide for complete backup setup instructions.
Immutable Backups (Ransomware Protection)
For ultimate ransomware protection, use backup destinations that support immutability (backups that can’t be modified or deleted):
- Backblaze B2: Object Lock feature
- AWS S3: Object Lock/Glacier Vault Lock
- Synology C2: Immutable backup options
Advanced Security Measures
Enable HTTPS Only
- Go to Control Panel → Login Portal → DSM
- Enable Automatically redirect HTTP connections to HTTPS
- Install Let’s Encrypt certificate: Control Panel → Security → Certificate
Encrypt Shared Folders
Encryption protects data if drives are physically stolen:
- Go to Control Panel → Shared Folder
- Create or edit folder
- Check Encrypt this shared folder
- Set encryption password
- Configure auto-mount on boot (or manual mount for highest security)
Enable Account Protection
- Go to Control Panel → Security → Account
- Enable Enable account protection
- Configure untrusted client settings
Recommended Hardware for Security
Synology DS923+
4-Bay | AMD Ryzen R1600 | 4GB RAM | 1GbE
Excellent security-focused NAS with Btrfs support for snapshots. Run VPN Server for secure remote access. Expandable storage for comprehensive backups.
CyberPower CP1500PFCLCD
1500VA/1000W | Pure Sine Wave | USB Monitoring
Protect against power-related data corruption. USB connection enables automatic graceful shutdown. Pure sine wave safe for NAS devices.
Frequently Asked Questions
No. Never expose your NAS directly to the internet via port forwarding. Use VPN for remote access, or at minimum use QuickConnect with 2FA enabled. Direct internet exposure makes your NAS visible to attackers worldwide.
Yes, NAS devices are targeted by ransomware. Protection requires: (1) Never exposing NAS directly to internet, (2) Keeping DSM updated, (3) Using strong passwords with 2FA, (4) Maintaining offline or immutable backups. With these measures, risk is minimal.
QuickConnect is safer than direct port forwarding because it doesn’t require opening ports. However, it still exposes your NAS to potential attacks via Synology’s relay. Always enable 2FA when using QuickConnect. VPN is more secure.
Signs include: unexpected files or encrypted files, unknown user accounts, high CPU usage, strange network activity, login notifications you don’t recognize. Check Control Panel → Log Center regularly. Security Advisor scans for compromises.
Yes, especially for security updates. The risk of an unpatched vulnerability being exploited far exceeds the small risk of an update causing issues. At minimum, enable notifications and apply updates promptly.
OpenVPN is recommended for best security and compatibility. L2TP/IPSec is easier to configure on iOS/macOS but slightly less secure. Avoid PPTP which has known vulnerabilities. For easiest setup, consider Tailscale which runs on top of WireGuard.
Conclusion
Securing your Synology NAS doesn’t require expert knowledge—just following these best practices. The most critical steps are: never expose your NAS directly to the internet, enable 2FA, keep DSM updated, and maintain proper backups. These alone prevent the vast majority of attacks.
Remember: security is not a one-time setup but an ongoing practice. Run Security Advisor regularly, stay informed about new threats, and keep your backup strategy current. Combined with Synology’s already-strong security reputation (see our Synology vs QNAP comparison), these measures make your NAS extremely secure.
Related Resources
- Synology Hyper Backup Guide
- Synology Active Backup Guide
- Synology vs QNAP Comparison
- Synology Drive Setup Guide
- Best Synology NAS 2026
- Synology DS923+ Review
- Synology DS224+ Review
Last Updated: February 2026