Synology Active Backup Guide: Complete Setup for PCs, Servers & VMs
Quick Answer+
Quick Answer: Active Backup for Business is Synology’s free enterprise-grade backup solution. Install from Package Center, deploy agents to PCs/servers, and create backup tasks with flexible scheduling. It supports Windows PCs, physical servers, VMware/Hyper-V VMs, Microsoft 365, and Google Workspace—all managed from a single console with deduplication to minimize storage usage.
Active Backup for Business transforms your Synology NAS into a comprehensive backup server capable of protecting your entire infrastructure—from employee laptops to virtual machines to cloud services. Best of all, it’s completely free with no per-device licensing fees, making it an incredible value compared to commercial alternatives like Veeam or Acronis.
This guide covers complete setup for all Active Backup modules: PC backup, server backup, virtual machine backup, and cloud service backup. We’ll walk through installation, configuration, best practices, and troubleshooting.
Why Active Backup for Business?
Before diving into setup, here’s why Active Backup stands out:
- Completely free: No per-device licensing—backup unlimited PCs, servers, and VMs
- Global deduplication: Reduces storage requirements by 50-70%
- Centralized management: Single console for all backup sources
- Bare-metal recovery: Restore entire PCs from bootable media
- Instant restore: Boot backed-up PCs as VMs for quick recovery
- Agentless VM backup: No software needed inside virtual machines
- Cloud service protection: Backup Microsoft 365 and Google Workspace
Prerequisites
System Requirements
- DSM Version: DSM 7.0 or later (DSM 7.2+ recommended)
- Btrfs File System: Required for deduplication (not ext4)
- RAM: 4GB minimum, 8GB+ recommended for 10+ devices
- Storage: Sufficient capacity for all backup sources plus retention history
- Network: Gigabit minimum, 2.5GbE+ recommended for multiple simultaneous backups
- Synology Account: Free account required for activation
Supported Backup Sources
| Source Type | Supported Versions | Agent Required |
|---|---|---|
| Windows PCs | Windows 7/8/10/11 (Pro, Enterprise) | Yes |
| Windows Servers | Server 2008 R2 through 2022 | Yes |
| Linux Servers | Ubuntu, Debian, CentOS, RHEL, Fedora | Yes |
| VMware vSphere | 5.0 through 8.0 | No (agentless) |
| Microsoft Hyper-V | 2012 R2 through 2022 | No (agentless) |
| Microsoft 365 | Exchange, OneDrive, SharePoint, Teams | No (API) |
| Google Workspace | Gmail, Drive, Calendar, Contacts | No (API) |
Recommended NAS Models
Synology DS923+
4-Bay | AMD Ryzen R1600 | 4GB RAM (expandable to 32GB) | 1GbE
Ideal for small businesses backing up 10-25 PCs/servers. AMD Ryzen handles deduplication efficiently. Expandable to 9 bays with DX517 for growing backup needs.
Synology DS224+
2-Bay | Intel Celeron J4125 | 2GB RAM | 1GbE
Perfect for home offices backing up 2-5 PCs. Compact and affordable while still supporting all Active Backup features. Upgrade RAM to 8GB for better performance.
Storage Recommendations
Seagate IronWolf 8TB
7200 RPM | 256MB Cache | CMR | 3-Year Warranty
Reliable NAS drive for backup repositories. AgileArray technology handles 24/7 operation. IronWolf Health Management integrates with DSM for proactive monitoring.
WD Red Plus 8TB
5640 RPM | 256MB Cache | CMR | 3-Year Warranty
Excellent alternative with quieter operation. NASware 3.0 firmware optimized for RAID environments. Slightly lower RPM reduces heat and noise.
Step 1: Install Active Backup for Business
- Log into DSM as administrator
- Open Package Center
- Search for “Active Backup for Business”
- Click Install
- Select destination volume (must be Btrfs file system)
- Sign in with your Synology Account when prompted
- Wait for installation and activation to complete
Important: The Synology Account sign-in activates the free license but doesn’t send any backup data to Synology. All backups remain local on your NAS.
Step 2: Configure Storage Settings
- Open Active Backup for Business
- Navigate to Settings → Storage
- Verify the backup destination volume
- Enable Global deduplication (highly recommended)
- Set storage warning thresholds (recommend 80% and 90%)
- Click Apply
Understanding Global Deduplication
Global deduplication is the key to Active Backup’s storage efficiency. It identifies identical data blocks across ALL backup sources—not just within a single backup.
- Typical reduction: 50-70% for similar Windows PCs
- Example: 10 PCs with 500GB each might only use 2TB instead of 5TB
- Incremental efficiency: Daily backups add minimal storage after initial backup
- Cross-device savings: Windows system files deduplicated across all PCs
Storage Calculation Example
| Backup Source | Source Size | Without Dedup | With Dedup |
|---|---|---|---|
| 10 Windows PCs | 500GB each | 5TB | ~2TB |
| 2 Windows Servers | 1TB each | 2TB | ~1.2TB |
| 30-day retention | Daily changes | +3TB | +500GB |
| Total | — | 10TB | ~3.7TB |
Module 1: PC Backup (Windows)
PC backup is the most common use case for Active Backup. It protects employee workstations with full system images that enable bare-metal recovery.
Deploy the Windows Backup Agent
- In Active Backup, navigate to PC → Add Device
- Download the Windows Agent installer
- Copy installer to target PC (via network share, USB, or email)
- Run installer as Administrator on the target PC
- Enter your NAS address (IP address or hostname)
- Enter DSM credentials (recommend creating a dedicated backup account)
- Complete installation—PC appears in Active Backup console
Tip: For enterprise deployments, deploy the agent via Group Policy or SCCM using the silent install command: Synology Active Backup for Business Agent-x.x.x.exe /S
Create a PC Backup Task
- Select the PC in Active Backup console
- Click Create Task
- Choose backup type:
- Entire Device: Full system image including all drives (recommended)
- System Volume Only: Just the Windows partition (C: drive)
- Custom Volume: Select specific drives to backup
- Configure backup schedule (daily recommended)
- Set retention policy
- Enable Changed Block Tracking for faster incrementals
- Configure bandwidth limits if needed
- Click Done
Recommended PC Backup Settings
| Setting | Recommendation | Reason |
|---|---|---|
| Backup Type | Entire Device | Enables bare-metal recovery |
| Schedule | Daily at 12:00 PM | Catches morning work, minimal disruption |
| Retention | 30 daily, 12 monthly, 5 yearly | Balance of history and storage |
| Bandwidth Limit | 50% during business hours | Prevents network congestion |
| Changed Block Tracking | Enabled | 90%+ faster incremental backups |
| Data Verification | Enabled | Ensures backup integrity |
Backup Templates for Multiple PCs
For organizations with many PCs, create a backup template:
- Go to PC → Template
- Click Create
- Configure all backup settings
- Save the template
- Apply template to new PCs automatically or manually
Module 2: Server Backup (Physical)
Windows Server Backup
The process mirrors PC backup with additional considerations for server workloads:
- Install Windows Agent on the server
- Create backup task selecting Entire Device
- Schedule during maintenance window (e.g., 2:00 AM)
- Enable Application-aware processing
Application-aware processing ensures consistent backups for:
- Microsoft SQL Server (transaction log truncation)
- Microsoft Exchange (mailbox consistency)
- Active Directory (domain controller state)
- SharePoint (farm consistency)
- Other VSS-aware applications
Linux Server Backup
Active Backup supports major Linux distributions:
- Download Linux Agent from Active Backup console
- Transfer to Linux server
- Install the agent:
# Debian/Ubuntu sudo dpkg -i synology-active-backup-agent_x.x.x_amd64.deb # RHEL/CentOS sudo rpm -ivh synology-active-backup-agent-x.x.x.rpm- Configure agent:
sudo abb-cli -c - Enter NAS address and credentials
- Server appears in console—create backup task
Module 3: Virtual Machine Backup
Active Backup provides agentless VM backup—no software needed inside the virtual machines.
VMware vSphere Backup
- Navigate to Virtual Machine → VMware vSphere
- Click Manage Hypervisor → Add
- Enter vCenter or ESXi host address
- Provide credentials with backup permissions
- Virtual machines appear in the inventory
- Select VMs to protect and click Create Task
VMware requirements:
- vSphere 5.0 or later
- CBT (Changed Block Tracking) enabled on VMs for fast incrementals
- Account with backup privileges
Microsoft Hyper-V Backup
- Navigate to Virtual Machine → Microsoft Hyper-V
- Click Manage Hypervisor → Add
- Enter Hyper-V host address
- Provide domain admin credentials
- Select VMs and create backup tasks
VM Backup Best Practices
- Enable CBT (VMware): Changed Block Tracking enables fast incremental backups
- Use application-consistent mode: For VMs running databases or Exchange
- Schedule during low activity: VM snapshots briefly pause I/O
- Test instant restore: Verify VMs can boot from backup
- Consider RTO requirements: Critical VMs may need more frequent backups
Module 4: Microsoft 365 Backup
Protect your organization’s cloud data—Microsoft 365 retention policies don’t replace proper backup.
Connect Microsoft 365
- Navigate to SaaS → Microsoft 365
- Click Create Task
- Sign in with Microsoft 365 Global Admin account
- Grant required API permissions (Exchange, OneDrive, SharePoint)
- Select users, groups, or entire organization to backup
- Configure backup schedule and retention
- Click Apply
What’s Protected
| Service | Data Protected | Granular Restore |
|---|---|---|
| Exchange Online | Emails, calendars, contacts, tasks | Individual items |
| OneDrive | All user files and folders | Files/folders |
| SharePoint | Sites, document libraries, lists | Sites/items |
| Teams | Channel conversations, files | Via SharePoint |
Why Backup Microsoft 365?
Microsoft’s shared responsibility model means YOU are responsible for your data:
- Accidental deletion: Recoverable for limited time only
- Ransomware: Can encrypt OneDrive/SharePoint files
- Malicious insiders: Employees can delete data before leaving
- Compliance: Regulations may require longer retention than Microsoft provides
- Migration: Backup enables easier tenant-to-tenant migration
Recovery Options
PC Recovery Methods
| Method | Use Case | How to Access |
|---|---|---|
| File-level restore | Recover specific files/folders | Active Backup Portal or agent |
| Entire PC restore | Replace failed hardware | Boot from recovery media |
| Instant restore | Quick verification or temporary use | Mount backup as VM |
| Granular restore | Application-specific data | Extract from backup |
Create Recovery Media
Essential for bare-metal recovery of failed PCs:
- In Active Backup, go to PC
- Click Create recovery media
- Choose format: ISO file or USB drive
- Download/create the media
- Store safely (multiple copies recommended)
- Test by booting a PC from the media
Pro tip: Create recovery media for both UEFI and Legacy BIOS systems if you have mixed hardware.
Instant Restore (PC as VM)
Instantly boot a backed-up PC as a virtual machine on your NAS:
- Select the PC backup
- Click Instant Restore
- Configure VM settings (RAM, CPU)
- VM boots directly from backup—no restore needed
- Use for verification or temporary access while hardware is repaired
Performance Optimization
RAM Upgrade
Active Backup’s deduplication engine benefits significantly from additional RAM:
Crucial 16GB DDR4 SODIMM
DDR4-3200 | CL22 | 260-pin SODIMM
Essential upgrade for Active Backup with 10+ devices. Improves deduplication performance and allows more concurrent backup tasks without slowdown.
Network Optimization
Multiple simultaneous backups can saturate gigabit connections:
Synology E10G22-T1-Mini
10GbE RJ-45 | E10G22 Mini Card | For DS923+/DS723+
10GbE upgrade eliminates network bottlenecks when backing up multiple PCs simultaneously. Essential for larger deployments or faster initial backups.
QNAP QSW-2104-2T
4x 2.5GbE + 2x 10GbE | Unmanaged | Fanless
Affordable multi-gig switch for faster backup speeds. Connect NAS via 10GbE, PCs via 2.5GbE for 2.5x improvement over gigabit.
UPS Protection
Protect your backup repository from power failures and data corruption:
CyberPower CP1500PFCLCD
1500VA/1000W | Pure Sine Wave | LCD Display | USB Monitoring
Pure sine wave output safe for NAS devices. USB connection enables automatic graceful shutdown via DSM before battery depletes.
APC BE600M1
600VA | Battery Backup | USB Charging | Compact
Budget-friendly protection for small NAS deployments. Provides enough runtime for graceful shutdown during brief power outages.
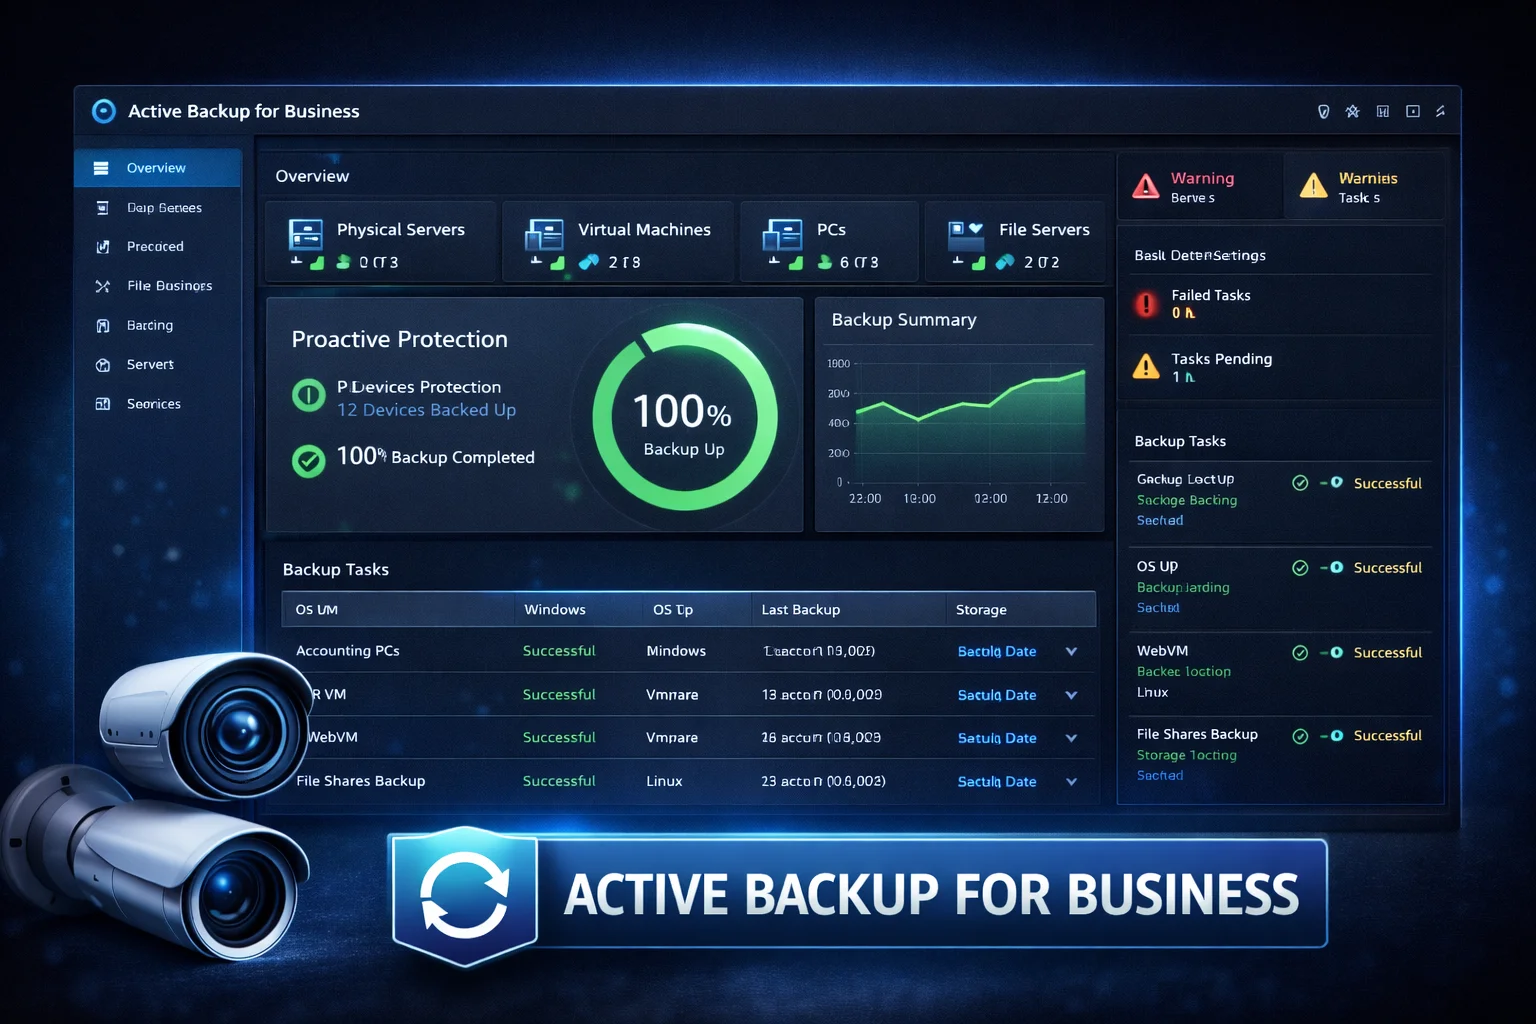
Monitoring and Maintenance
Dashboard Overview
The Active Backup dashboard provides at-a-glance status:
- Backup status: Success, warning, or failure for each device
- Storage usage: Total backup size and deduplication ratio
- Recent activity: Latest backup jobs and their results
- Device health: Agent connectivity status
Email Notifications
Configure email alerts for backup status:
- Go to Settings → Notification
- Enable email notifications
- Configure SMTP settings
- Select notification triggers (failure, warning, success)
- Add recipient email addresses
Regular Testing
Backups are worthless if they don’t restore. Schedule regular restore tests:
- Monthly: File-level restore test
- Quarterly: Instant restore test (boot PC backup as VM)
- Annually: Full bare-metal recovery test on spare hardware
Frequently Asked Questions
Yes, completely free with no per-device licensing. You need a free Synology Account to activate, but there are no ongoing costs regardless of how many PCs, servers, or VMs you backup. This makes it exceptional value compared to Veeam, Acronis, or other commercial solutions.
With global deduplication, expect 50-70% storage reduction for similar Windows PCs. A rough estimate: total source data divided by 2-3, plus room for retention. Example: 10 PCs with 500GB each might need only 2-3TB after deduplication instead of 5TB.
No, Active Backup for Business only supports Windows PCs and Linux servers. For Macs, use Time Machine with your Synology NAS as the destination (enable via Control Panel → File Services → SMB → Advanced → Enable Time Machine), or use Synology Drive Client for file-level backup.
Yes. Remote PCs can backup over VPN connection to your NAS. For best results, use Synology’s built-in VPN Server package or configure split tunneling to route only backup traffic through VPN. Initial backups may be slow over VPN—consider doing the first backup locally.
Active Backup protects external devices (PCs, servers, VMs, cloud services) by backing up TO your NAS. Hyper Backup protects your NAS data by backing up FROM your NAS to external destinations (cloud storage, USB drives, another NAS). Most organizations need both for complete protection.
Initial backup time depends on data size and network speed. Over gigabit: ~3-4 hours per 100GB. Over 2.5GbE: ~1.5 hours per 100GB. A typical 500GB PC takes 15-20 hours over gigabit for the first backup. Subsequent incremental backups typically complete in minutes.
Conclusion
Active Backup for Business transforms your Synology NAS into a comprehensive backup solution rivaling commercial products costing thousands in licensing fees. With support for Windows PCs, physical servers, VMware/Hyper-V VMs, and Microsoft 365, it provides complete infrastructure protection—all completely free.
For best results, ensure your NAS has adequate RAM (8GB+ recommended for 10+ devices), use Btrfs file system for deduplication benefits, and consider network upgrades for larger deployments. Most importantly, create recovery media and test restores regularly—backups are only valuable if they work when you need them.
The combination of zero licensing costs, global deduplication, and enterprise features makes Active Backup for Business one of the most compelling reasons to choose Synology for your backup infrastructure.
Related Resources
- Synology Hyper Backup Guide
- Best Synology NAS for Small Business
- Synology DS923+ Review
- Synology DS224+ Review
- Synology Photos Setup Guide
- Fix Synology Slow Transfer Speeds
Last Updated: February 2026